 Virtual Colossus
Overview
Virtual Enigma is a web-based simulation of Enigma. It needs a computer that can run a recent web browser, and there’s nothing to install. Google Chrome is recommended on PC and Mac for compatibility and speed.
It can also run on a fast phone or tablet, although results vary from one device to another. In mobile mode you can look around by moving your phone, and use the touch screen to work the controls.
Controls on a computer
There are two modes, and you can switch between them. The first is cursor mode, where you use the cursor to work the buttons and objects in the virtual world. The second is view mode, which lets you look around and move about.
Click anywhere on the screen where the standard arrow cursor is shown to move into view mode. The cursor is hidden, and moving the mouse changes where you are looking. Click again to return to cursor mode.
In view mode, use the W A S D keys (or the arrow keys) to move around: W and S move you forwards and backwards, A and D from side to side. This lets you move to get a good view of something.
In cursor mode, the cursor changes to a pointing hand over objects you can interact with. Try clicking on the top of the Enigma case (the wooden box in the centre of the table) to open it.
Some objects need just a click, while others are used by clicking and holding the mouse button, then dragging left and right or up and down. The cursor changes to a set of arrows when you hold the button down, showing which way to move. For example, try clicking and dragging on one of the rotors.
Controls on a phone or tablet
On a phone or tablet with orientation sensors, Virtual Enigma switches to mobile mode. Hold your phone upright in front of you, preferably in portrait to start with.
If you can’t see the Enigma on its table, try turning round with your phone: Enigma may be behind you.
A camera position pad at the bottom right lets you jump quickly between some useful preset views; just press the left or right arrows. The lower part of this pad (with the Stecker plug) switches you in and out of the Stecker setting view, to make it easier to set the Stecker cables.
At the bottom left is a cursor pad, for fine-tuning the camera position if you want a different view from the presets.
To press keys or move switches, just touch them on screen, or touch and drag to change a switch’s position.
The clipboard
At the top left of the screen is a blue button marked Clipboard. This helps you send and receive Enigma messages. When Enigma was used during WW2, the normal procedure was for one person to type the message while another wrote down the letters shown by the lamps.
As you type on Enigma, each letter that lights up is written automatically in the top section, and any messages received on the transceiver are shown in the lower section.
The buttons along the top, from left to right, are:
- Write current settings: types the letters the rotors are currently set to, for use in the key.
- Show Morse code: converts any text in the sending section to Morse code.
- Clear page: empties both sections.
- Enter: moves down a row in the sending section.
- Transmit Morse: type or paste text into the input box and press the transmit button to send it as Morse on the transmitter’s current frequency.
Enigma I quick start
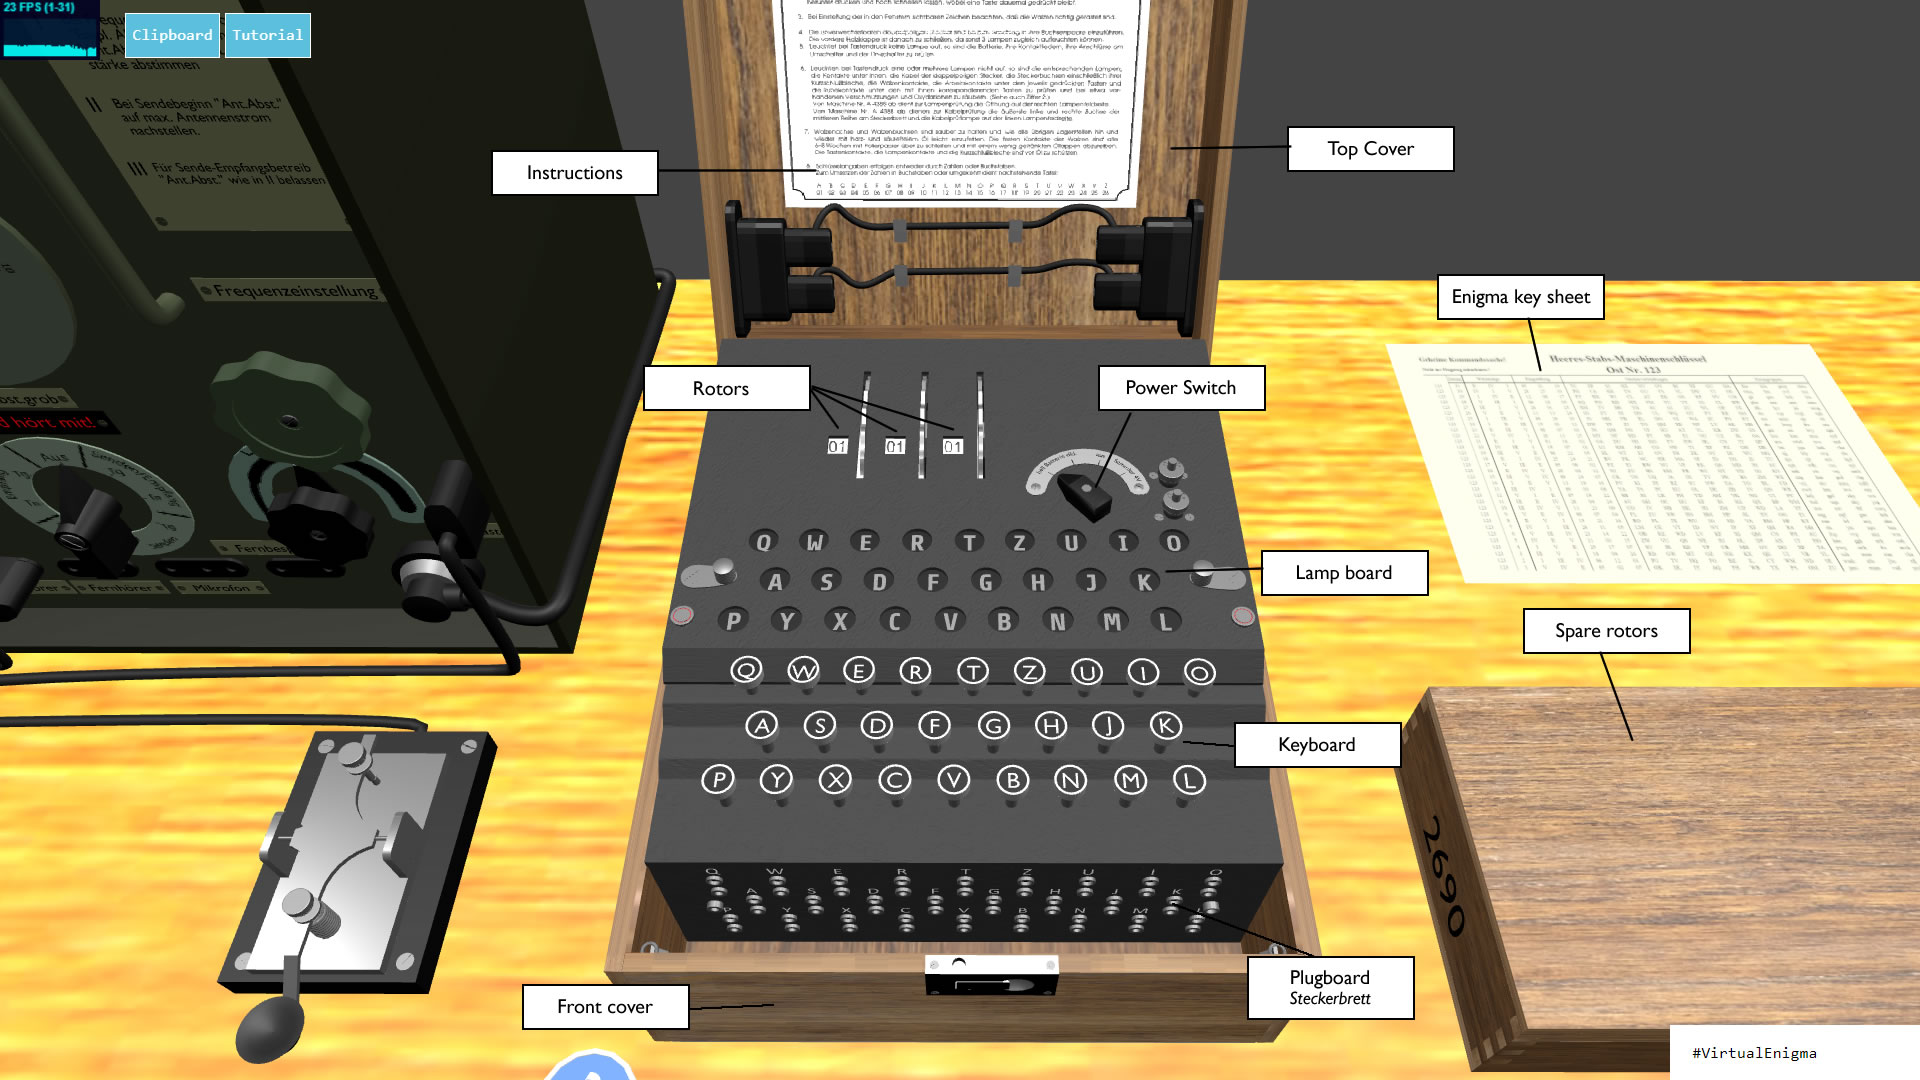
How to encipher a message on the Enigma I
Stand in front of Enigma and open the top and front covers by clicking on them in cursor mode.
The power switch is the black dial at the top right of the machine. It has four settings, from left to right: hell Batterie (battery, bright), dkl. Batterie (battery, dark), aus (off) and Sammler 4V (4 V external supply). The first two run from the internal battery and set how bright the lampboard is, while the 4 V setting lets an external supply be connected to the terminals to the right of the switch.
Click and hold the mouse button on the power switch, then drag to the left until it is set to hell Batterie.
Before typing the message to be enciphered, the operator would choose three random letters and set the three rotors so the number of each letter showed in the rotor’s window. Letters are converted to numbers using the table on the lid of the Enigma, where A = 01, B = 02 … Z = 26. For example, to set FNB you would set the rotors to 06 14 02.
Click on a rotor where its number shows in the small window, or on its thumbwheel, then drag up or down to turn it. Set all three rotors to a random start position.
You are now ready to encipher your message. As you type each letter, the right-hand rotor moves on one position, changing the wiring in the scrambler, while the middle and left-hand rotors move each time the rotor to their right has made a full turn. This means you will most likely get a different letter each time, even if you keep pressing the same key.
Press and hold each letter of your message in turn, and note down the letter shown on the lampboard. You can click on the keys of the Enigma or use your own keyboard, if you have one.
Setting the day key
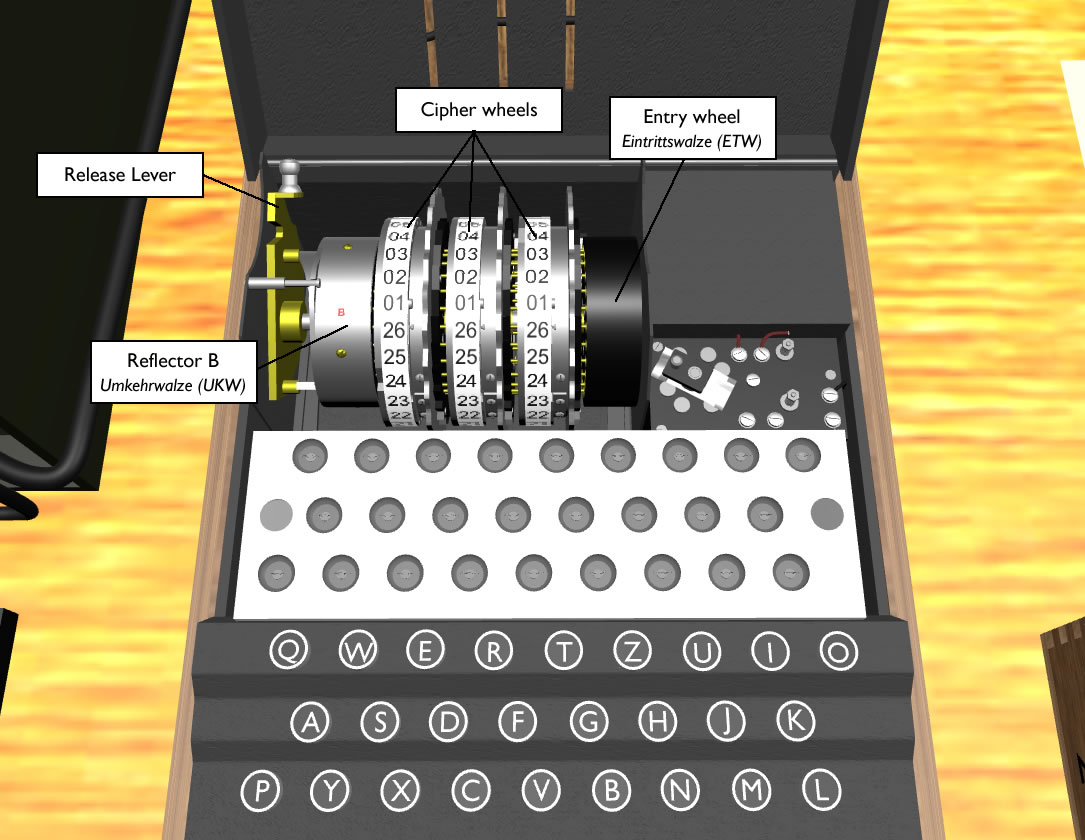
Removing the rotors
First, open the top cover of the Enigma by clicking on it. Inside you will see the three cipher rotors, between the entry wheel (ETW) on the right and the reflector (UKW) on the left, marked with a red B.
The rotors are removed using the release lever on the left of the machine, which moves the UKW to the left, making room to lift out the rotors on their axle. The wooden box to the right of the Enigma holds the two extra rotors (IV and V); click on the box lid to open it.
The order of the three rotors in the machine was chosen each day from a key sheet. The Enigma I simulated here has five rotors in total, giving 60 possible combinations. An example key sheet is on the table: click on it to bring it up next to the rotors. The key sheet has a row for each day of the month, listed under the column Datum. Let’s try the settings for day 25.
Swapping rotors
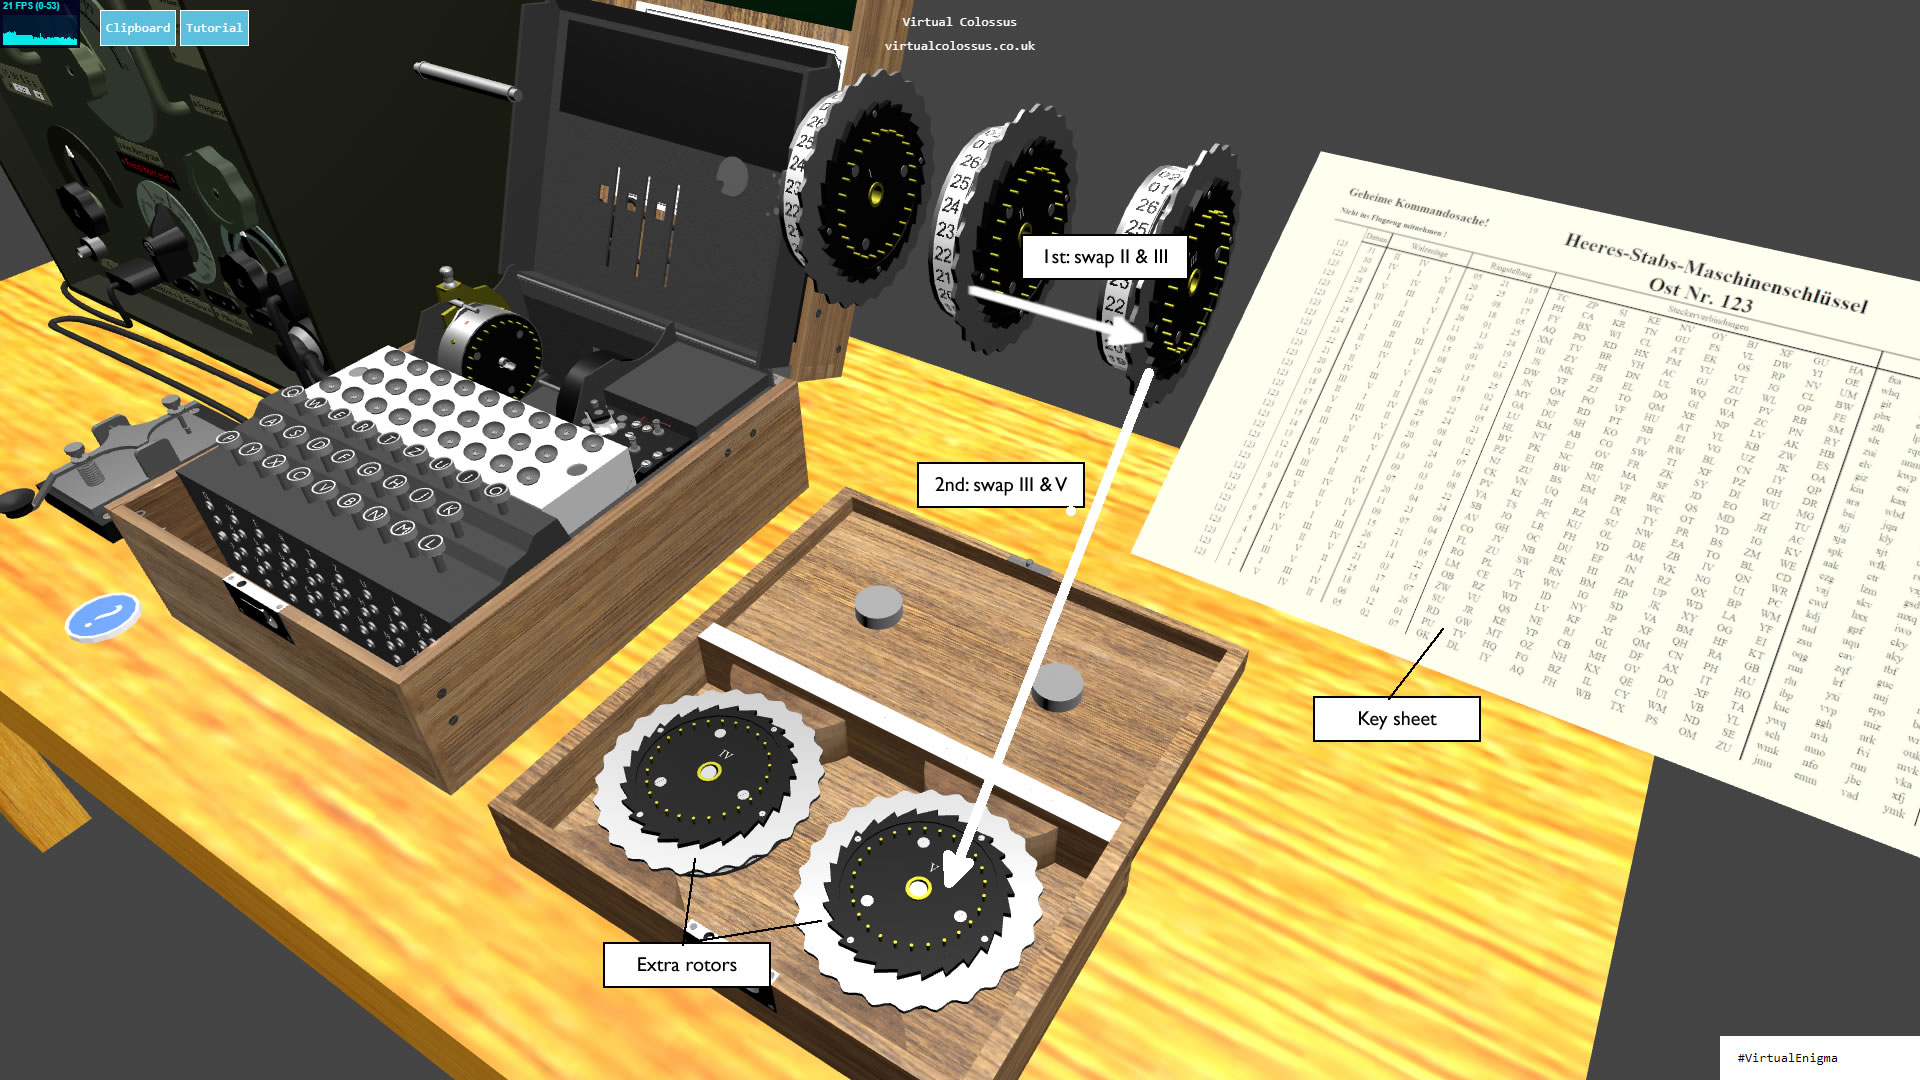
The next three columns, under the heading Walzenlage (rotor order), show I, III and V for day 25, so we need to change the second and third rotors. Rotor I is already in the right place in this simulation.
The rotor numbers are shown on the right-hand side of each rotor, and swapping rotors is simply a matter of clicking and dragging one rotor onto another. To swap with a rotor in the box, always start with one of the three main rotors held in mid-air and drag it onto one in the box.
First swap rotors II and III: click on rotor II (the middle one), drag the cursor onto rotor III (on the right), then let go of the mouse button.
Next we need to swap rotor II (now on the far right) with rotor V, which is in the spare box.
Click on rotor II (the right-hand one), drag the cursor onto rotor V (in the box), then let go to swap them.
The three main rotors should now be I, III and V.
Setting the Ringstellung
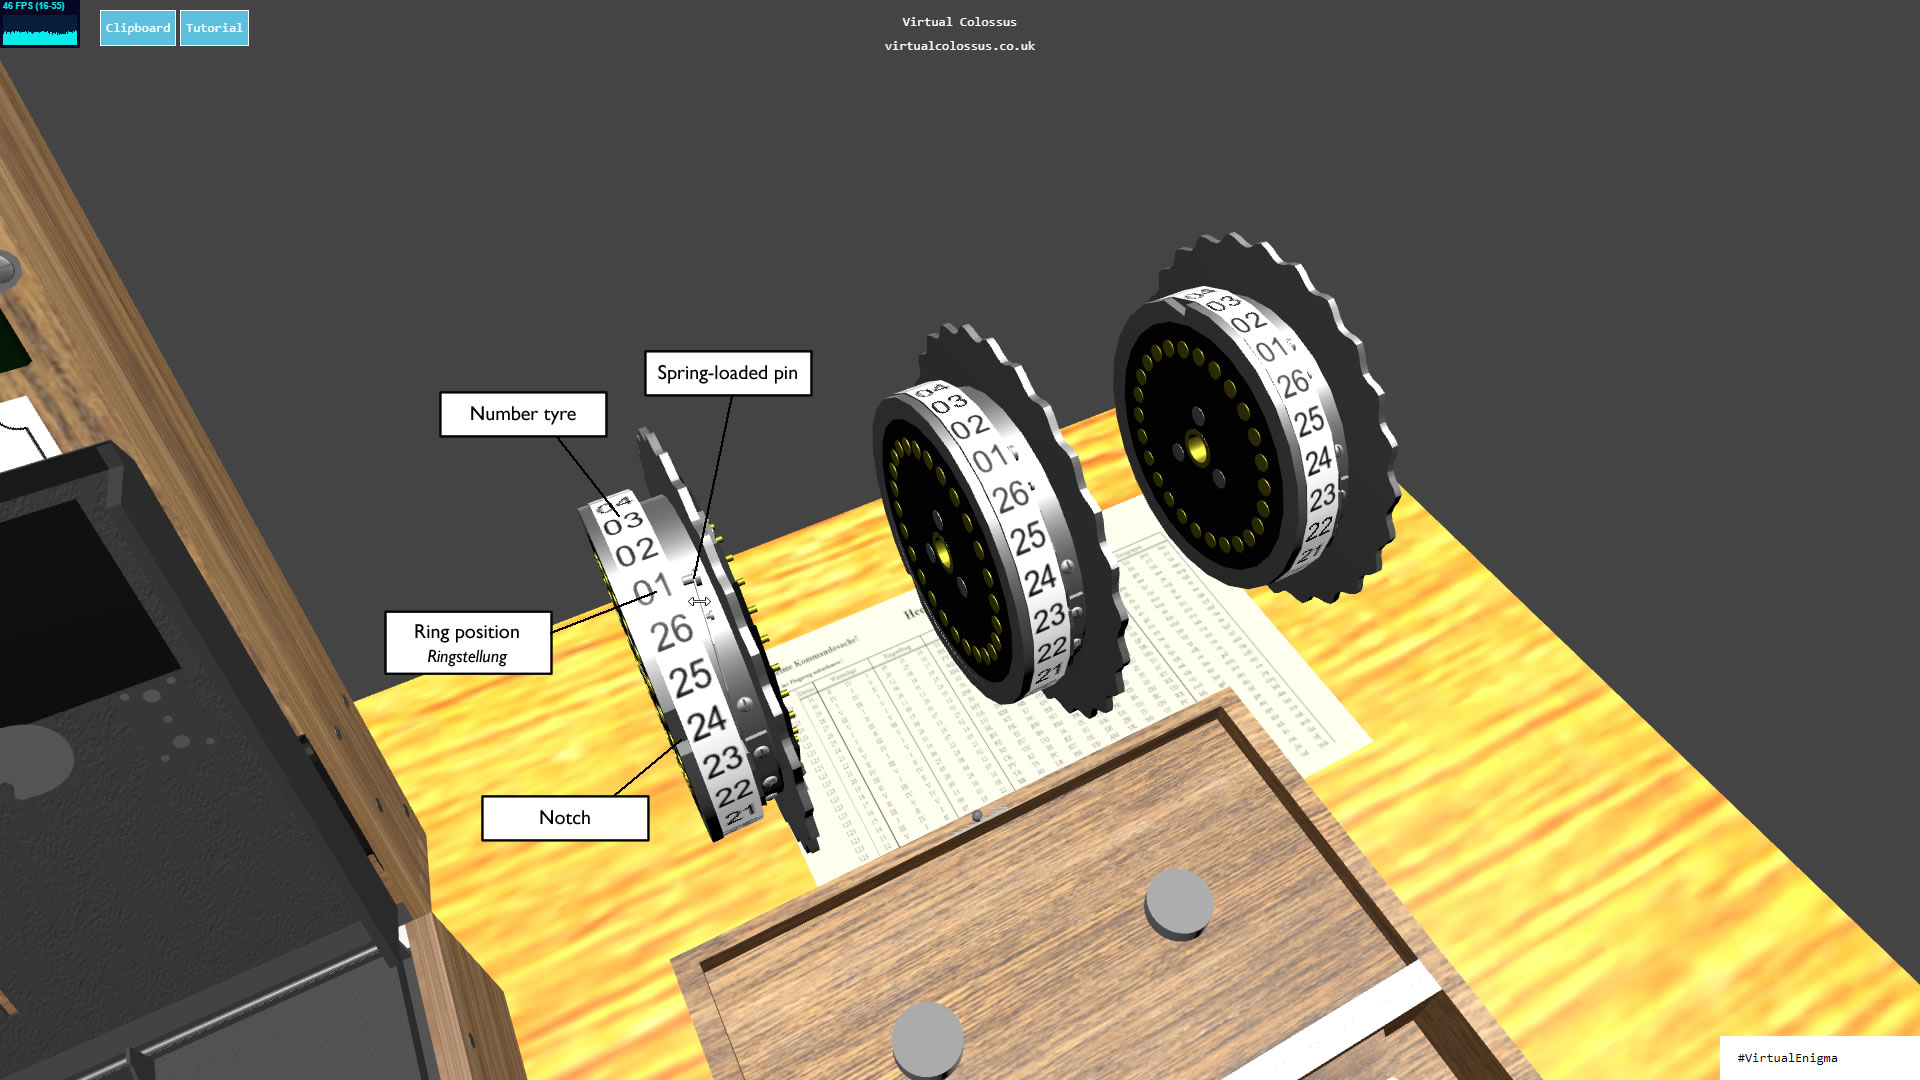
The Ringstellung (ring setting) is another setting on each rotor, which turns the number tyre and notch relative to the wiring. Look at the first rotor, between the number tyre and the thumbwheel, at the 01 position. You should see a spring-loaded pin in the 01 setting, which means the Ringstellung for this rotor is 01. On the key sheet there are three columns headed Ringstellung; the values for day 25 are 09, 20 and 19.
To change the Ringstellung, you first pull out the pin to unlock the tyre, turn the tyre, then let the pin back in to lock the rotor.
On the first rotor, drag up or down to find the 01 position where the pin is. Click the pin to pull it out, then drag up or down again to turn just the tyre and notch until 09 is next to the pin. Click the pin again to fix it. Repeat for rotor III (set to 20) and rotor V (set to 19).
Putting the rotors back
We have now set up the rotor order and Ringstellung, so the three rotors can go back into the Enigma. They sit in order on their axle, which is placed back between the ETW and UKW, and the release lever is set back to lock them all together.
Click on the rotor release lever to put the rotors back and lock them in place. Then click on the Enigma lid to close it.
Setting the Steckers
To complicate the encryption further, a number of cables were plugged into a board at the front, swapping pairs of letters. On the Enigma I, ten cables were supplied, each swapping two letters.
Open the front cover of the Enigma. For a closer view of the Stecker board, click the blue Stecker plug icon on the table top, in front of and to the left of the Enigma. This also moves the key sheet closer.
Look at the key sheet again and you’ll see a list of ten pairs of letters; for day 25 it starts JS MK FB … These are the pairs of letters to connect with cables on the Stecker board.
To fit a cable, click on an empty socket to fit the first end. The second end then follows the cursor as you move over the other sockets. When you are over the right socket, click again to fit the second plug. To move a cable, click on an end that is already fitted to pull it out, then click again to fit it somewhere else. To remove a cable completely, click on one plug as before, then click on the removed plug itself.
Click on the socket marked J, move the second plug to socket S and click again to fit the cable.
Fit the second cable the same way: click on socket M, move the second plug to socket K and click again. Fit all ten cables the same way, then click the blue Stecker plug icon again to go back to the normal view.
This completes setting the day key. As the name suggests, it was set first thing in the morning and stayed the same all day, until it was reset the same way the next day.
Enciphering a message on the Enigma I
Setting the message key before 1940
Before 1940 the German Army used this method to set the key for each new message. The day key sheet gave a fixed start position, the Grundstellung. The operator picked three letters at random, for example RLW, set the rotors to the Grundstellung letters, for example TKC (using the table on the instruction sheet stuck inside the box lid), and typed his chosen letters twice, to make sure there were no errors. This might have given the letters YQCPKR on the lamps. The operator then set his Enigma to RLW and enciphered his message. The six key letters were sent at the start of the message. The receiving operator set up his Enigma from the same key sheet and set his rotors to the same Grundstellung. Typing in YQCPKR, his Enigma would decipher them back to RLWRLW, so he knew to set his Enigma to RLW to decipher the message correctly.
The problem was that repeating the same letters twice was quite a security flaw. It was spotted and used by the team at the Polish Cipher Bureau, Marian Rejewski, Jerzy Różycki and Henryk Zygalski, to make the first break into Enigma traffic and read most of the German messages.
Setting the message key after 1940
Realising this flaw, the German Army changed its procedure after 1940, and this is the one we will use with this Enigma I simulation.
As before, the operator sets the rotors, ring settings and plugboard each day from the key sheet. For each new message he picks two random trigrams (groups of three letters): a Grundstellung, or start position, and a Spruchschlüssel, or message key. He turns the rotors to the chosen Grundstellung and types in the Spruchschlüssel just once, which gives a new, encrypted three-letter group. To encipher the message, he then sets the rotors to the Spruchschlüssel and types in the message, noting down the letter each lamp shows. The key letters sent are the chosen Grundstellung followed by the encrypted Spruchschlüssel.
An example
This example uses the day key for day 25, set up in setting the day key above. First make sure the Enigma is switched on, by turning the switch on top fully to the left to the hell (bright) setting. Next we pick a random Grundstellung, say DKR, and from the table we find we should set the rotors to 04 11 18.
Click and drag the left-hand rotor until 04 shows in its window. Set the second and third rotors to 11 and 18.
Next we choose a different random trigram, OCW, and type it one letter at a time, noting which letter lights up each time.
Press O, C and W, noting the letters shown: in this case WGB.
This new trigram is our encrypted message key. Putting it after the Grundstellung we chose gives the key we will send: DKR WGB. We’ll need this when we send the message.
Now, to write out our message, we change the rotor start position again, this time to OCW, which is 15 03 23.
Set the rotors to 15 03 23.
Finally, type out the message to be encrypted, again holding down each key and noting which letter lights up. Where there is a space, Enigma operators used the letter X instead.
Type SECRETXMESSAGE, which should encrypt to OXPSQ LZXMO ERYB.
The last step before the message is ready to send is to add a Buchstabenkenngruppe (letter identification group) at the start of the enciphered message. This five-letter group tells the recipient which key was used for this message. That matters if a message is sent late in the day on one key, but received early the next day: the recipient needs to know it was made with yesterday’s key.
The Buchstabenkenngruppe is made up of two random letters and one of the four three-letter Kenngruppen on the key sheet. On the row for day 25, the last column, headed Kenngruppen, gives ZUI, NNM, UJR and EII. Picking UJR at random and adding two letters in front gives, for example, TPUJR.
This group is added to the start of the encrypted message (it isn’t enciphered on the Enigma) to complete the message, ready to send:
TPUJR OXPSQ LZXMO ERYB
Sending your message
Preparing the header
The last step before sending the encrypted message is to write the message header, which gives the recipient information about the message: the time it was written, the number of parts it is split into, the number of letters in the message and the message key we made above. An example header for our message would be:
2230 = 2tle = 1tl = 22 = DKR WGB
The first part is the time the message was written, on the 24-hour clock (22:30, or half past ten at night). The second and third parts, 2tle and 1tl, show how many parts (Teile) the message is split into, and which part this is. A long message was split into several parts, each encrypted with a new key and Buchstabenkenngruppe. So this example shows the message has two parts (2tle) and this is the first (1tl).
Next comes the number of letters in the message, including the five of the Buchstabenkenngruppe: 22 in total. This is so the recipient can check the whole message arrived correctly. Last comes the message key we made above: the Grundstellung we chose, followed by the encrypted message key, DKR WGB.
So the whole message we want to send on the transceiver is:
2230 = 2TLE = 1TL = 22 = DKR WGB TPUJR OXPSQ LZXMO ERYB
Using the transceiver
We’re now ready to send our message, so move over to the transceiver.
The transceiver modelled in this simulation is the Telefunken 15W.S.E.a, a 15-watt Sende-Empfänger (transmitter-receiver). Before using it, note the warning in red on the front: “Feind hört mit!”, the enemy is listening! Virtual Enigma sends the characters you transmit across the internet to anyone else using Virtual Enigma on the same frequency. If you don’t want this, simply leave the on/off switch at Aus (off).
To switch the transceiver on, turn the on/off dial at the bottom centre one position to the right, to the Senden/Empfang Tg setting (the only one currently simulated).
Click and drag the dial to the right, to the Tg setting.
The frequency dial is the green dial to the upper right of the on/off switch, marked Frequenzeinstellung. Turning it changes the frequency you send and receive on. If you want to send to and receive from a friend using Virtual Enigma, agree a frequency in advance and both set it. Some frequencies have automated scripts that send encrypted traffic regularly.
Sending the message
If we have a real, live recipient, we first need to check they are on the same frequency. You can send Morse with the Morse key on the table (or hold down your Space bar), or open the clipboard and type a message, which is converted to Morse and sent for you. Open the clipboard with the blue button at the top of the screen, and return to the tutorial with the Tutorial button.
Type ARE YOU RECEIVING ME in the input box marked “Convert to Morse and transmit” (see the image below) and click the blue transmit button at the end to send it. Hopefully they will reply, so you know they are ready for your message. While chatting in plain text before sending your encrypted message, don’t give away any personal information an enemy listening in might use.
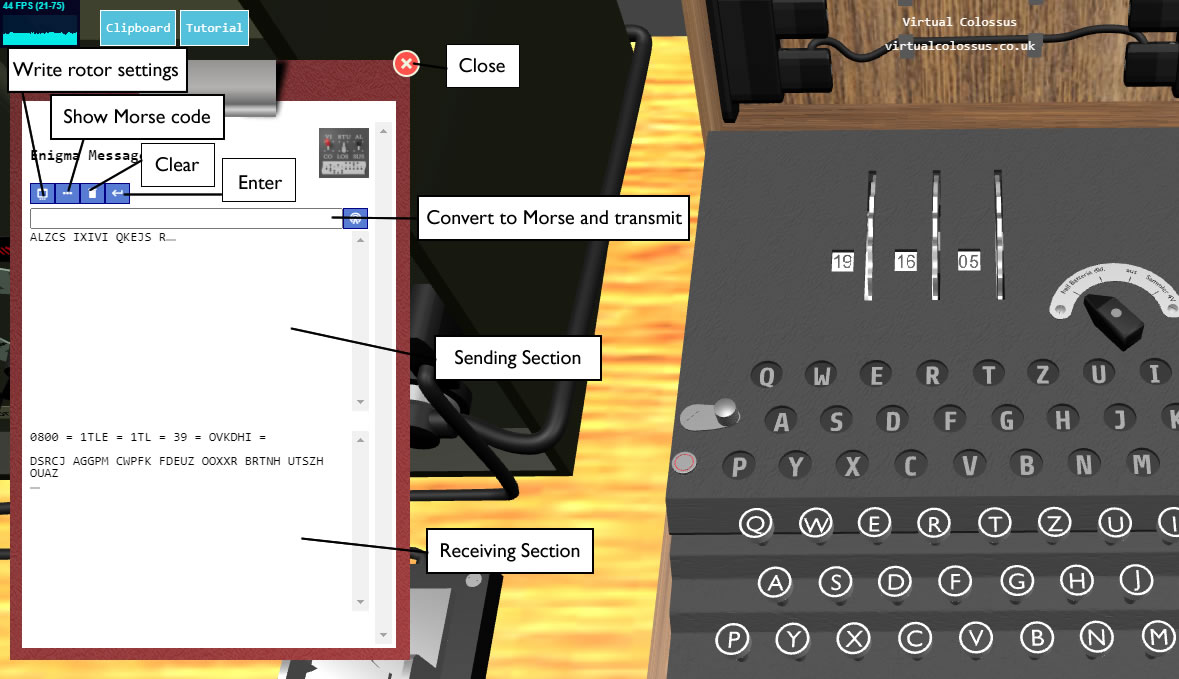
Press the clear button (the third one along) at the top of the clipboard to clear anything already there. Then type in the message above, or copy and paste it into the input box (on Windows, select the text and use Ctrl+C to copy and Ctrl+V to paste), and click the transmit button.
Deciphering a message
Reading the header
Once we’ve received an encrypted message, we need to know how to decrypt it so it can be read. Let’s look at the example message we sent above.
2230 = 2TLE = 1TL = 22 = DKR WGB TPUJR OXPSQ LZXMO ERYB
The header shows the time it was sent, the number of parts (part 1 of 2, although we’re ignoring the fact we’ve only sent one so far), the number of letters in the message and the message key.
First, check that 22 letters have been received; if not, a letter may have been missed or corrupted in transmission. Second, check which key the message was enciphered with. Remember, the day key changes at midnight, so a message sent late at night might not be decrypted until the next day, when we would need to use yesterday’s key.
To do this, take the first group of five letters, TPUJR. This is the Buchstabenkenngruppe and isn’t part of the encrypted message. The first two letters were chosen at random by the sender, so the important part is the trigram UJR. Today’s example is from the 25th, so look at the key sheet on the desk: on the row for Datum 25, UJR is in the list of Kenngruppen in the last column, so we know we have the right day key. If the message were from another day, we would check back day by day until we found the matching Kenngruppe.
Setting the day key
Next, set up the Enigma from the day key: check the rotors are in the order on the sheet (I, III, V), the Ringstellung are set correctly (09, 20, 19) and the Steckerbrett cables are all fitted as listed (JS, MK, FB … RY). See setting the day key above if you’re not sure how.
Finding the message key
Now take the key that was sent, DKR WGB, which is two trigrams. The first, DKR, is the Grundstellung, so set the rotors to this start position, using the table on the lid to find the numbers for each letter.
Set the rotors to 04 11 18.
To decrypt the start position used to encipher the message, type in the second trigram, WGB. As long as our Enigma is set up exactly the same way as the sender’s, we should get the right start position back.
Press W, G and B, writing down the letters that light up (or check the clipboard).
Deciphering the message
If everything is set up correctly, you should have seen OCW. If not, go back, check your day key settings and start again.
To decipher the message, set the rotors to the numbers for this key, which should be the one the message was originally encrypted with.
Set the rotors to 15 03 23.
Now carefully type in the message, remembering to skip the first group of five letters. Start from OXPSQ, again noting which lamps light.
Type the letters of the encrypted message: OXPSQ LZXMO ERYB.
Did you get the message SECRETXMESSAGE? If so, congratulations on your first Virtual Enigma decrypt!
How the Enigma M4 differs
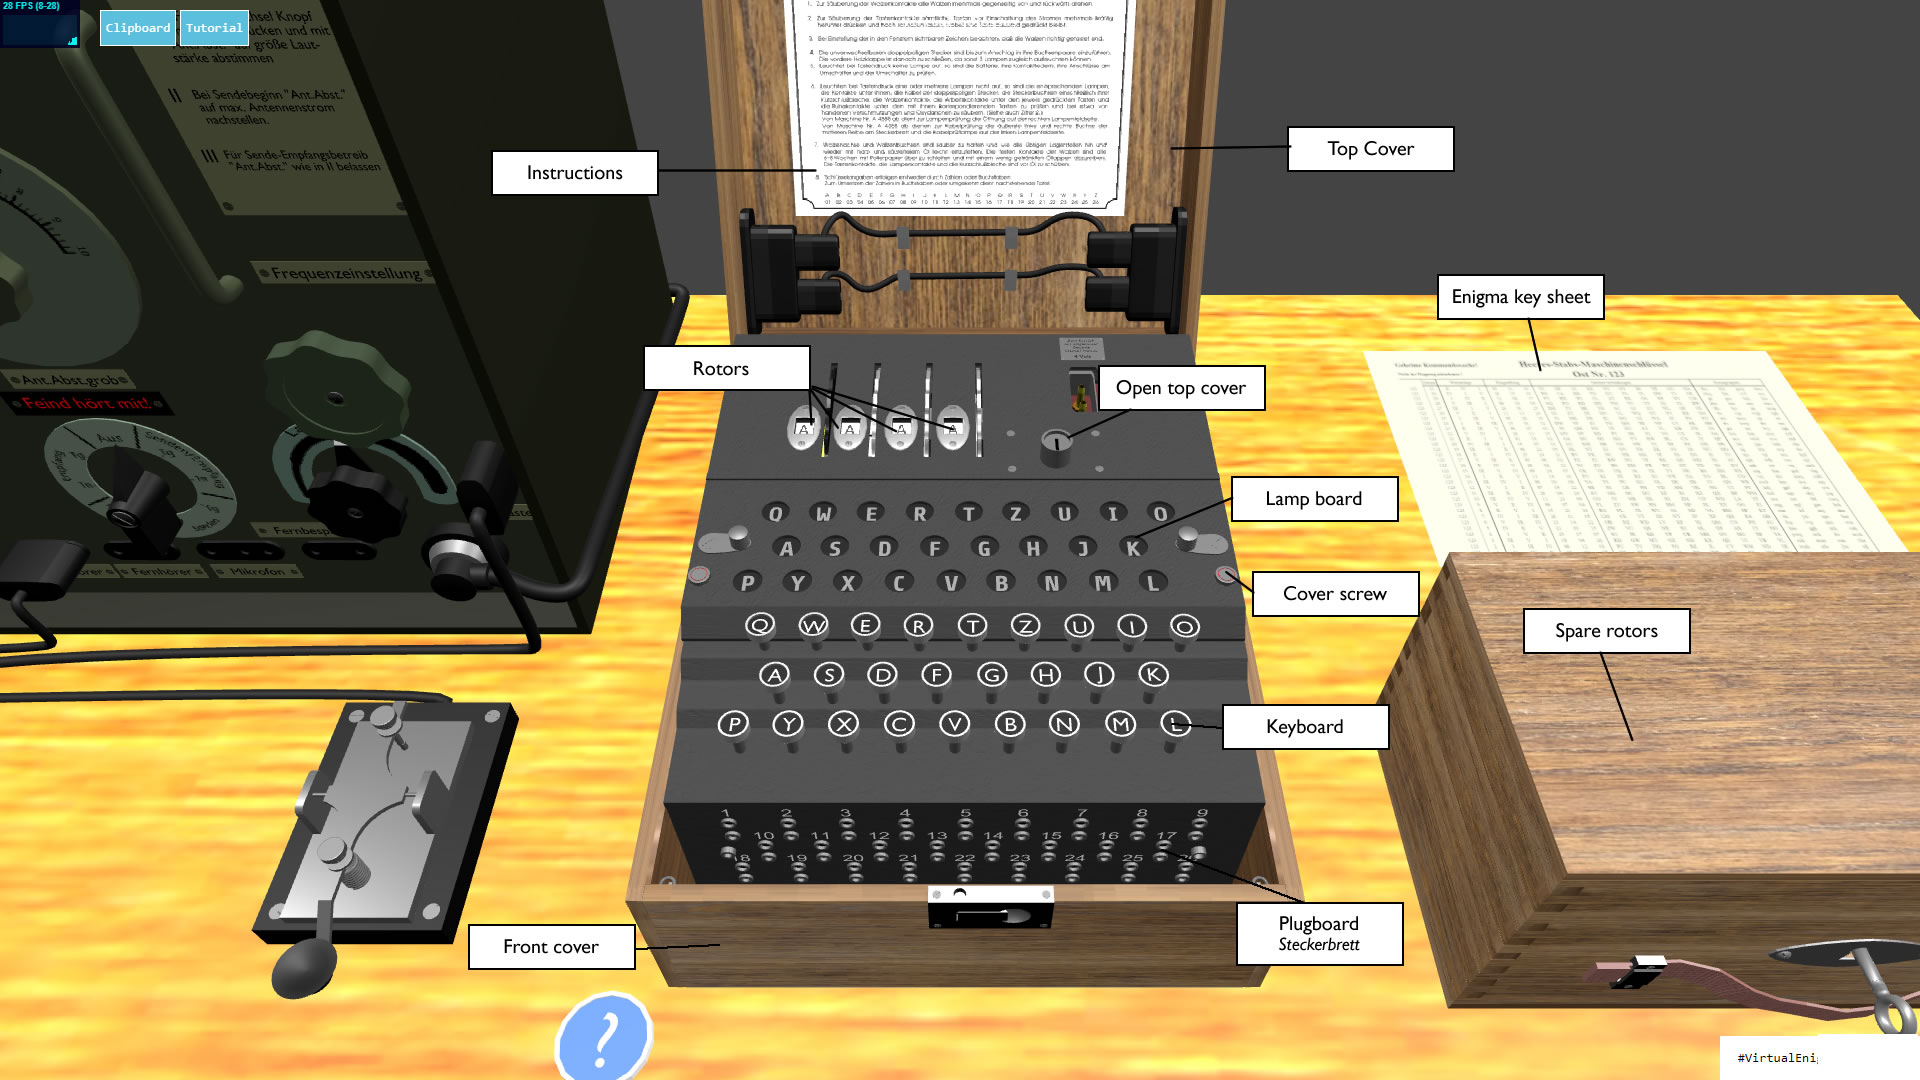
The M4 was developed for the Kriegsmarine, the German Navy. Although based on, and compatible with, the Army’s Enigma I, a number of changes were made to make it more secure. It was famously used on the German U-boats, where it caused Bletchley Park many problems: they could not read the new traffic from this machine until key sheets were captured.
Changes to the rotors
The Kriegsmarine supplied not only the same five rotors as the Army, so the new machine was backwards compatible, but three more as well, giving eight rotors to choose from. The rotors are a similar size to the Enigma I’s but have the letters of the alphabet around the tyre rather than numbers, which made setting the message key simpler than using a table. The Ringstellung (ring setting) was changed by pressing two levers at the same time, rather than with a spring-loaded pin.
The Zusatzwalze (extra wheel)
An extra, fourth wheel was added by replacing the Army model’s larger fixed reflector with a thinner, interchangeable reflector and a thin extra rotor just to the left of the three usual wheels. The fourth wheel can be set to any of the same 26 positions and adds another level of encryption, but it does not turn during encipherment like the other three; it stays still. Two versions of the extra wheel were supplied, named Beta (β) and Gamma (γ), plus two versions of the new thin UKW (reflector), named b and c (lower case, to tell them apart from the standard UKWs). The thin b and c reflectors are wired differently from the standard Enigma I B and C, but the b UKW with the Beta rotor set to A was wired to be compatible with B. Likewise the c UKW with the Gamma rotor set to A was compatible with the C UKW. The Beta and Gamma rotors are thinner, have pins on both sides (unlike the pins and contacts on the standard rotors) and can only be swapped with each other, not with any of the other eight rotors. On Beta and Gamma the Ringstellung is still changed with a spring-loaded pin.
Changes to the machine
The most obvious difference is that the top cover is split in two. The upper part, giving access to the rotors, has its own lock so only authorised officers could get at them. The lower part, over the lampboard, could be removed on its own to fit the optional Schreibmax printer (see cryptomuseum.com). The battery was replaced with a smaller one to make room for a power socket, so the machine could run directly from the U-boat’s 4 V DC supply. The Steckerbrett is still at the front of the machine, but its sockets are numbered 1–26 rather than lettered.
To switch between the Enigma I and the Enigma M4, hover over the model name at the top right of the screen (VirtualEnigma Model I ▼) and click the other model. The simulation reloads with that machine.
For a full tutorial on sending and receiving an Enigma M4 message, click the blue Tutorial button at the top left of the simulation, next to Clipboard. Its index also lists the automated messages and daily code-breaking challenges, with their times and frequencies.